Cloudflare Setup Guide: How to Set Up Your Website Step by Step
Setting up Cloudflare doesn’t have to feel technical or overwhelming. This Cloudflare Setup Guide walks you through every step, helping you protect your site, improve performance, and manage your DNS from a single dashboard.
From creating your account to fixing common setup problems, you’ll learn everything you need to configure Cloudflare correctly and get the most out of its features.

Key Overview – Cloudflare Setup Guide
If you’re short on time, here’s the whole process at a glance. You can jump to any section for the full details, or use this table as a quick checklist while you work.
| Step | What You Do | Time Needed |
| 1 | Create a free Cloudflare account | 2 minutes |
| 2 | Add your website and let Cloudflare scan your DNS records | 3 minutes |
| 3 | Update your nameservers at your domain registrar | 5 minutes |
| 4 | Wait for DNS propagation | Up to 24 hours |
| 5 | Configure SSL/TLS, caching, and firewall settings | 10–15 minutes |
Most people finish the technical part in under 20 minutes. The nameserver propagation is the only step that takes real waiting time, and even that usually finishes much faster than the maximum window.
What Is Cloudflare and How Does It Work?
Before you touch any settings, it helps to know what Cloudflare actually does behind the scenes. It’s not just a plugin or an add-on; it sits between your visitors and your server.
That position gives it a lot of power. It can block bad traffic, cache your content closer to your users, and encrypt every connection automatically.
What Is Cloudflare?
Cloudflare is a Content Delivery Network (CDN) and security service that routes your website’s traffic through its global network. Instead of visitors connecting directly to your origin server, they connect to Cloudflare first.
Cloudflare then decides what to serve from cache, what to block, and what to pass along. Millions of sites use it, from small blogs to large enterprises.
How Cloudflare Protects and Speeds Up Websites
Cloudflare protects your site by filtering out malicious requests before they ever reach your host.
It also speeds things up by storing static files in its edge cache, so visitors load pages from a server near them instead of your original hosting location.
Features like Brotli compression and HTTP/3 shave off extra load time too. The combined effect is a site that’s both safer and noticeably faster.
What You Need Before Setting Up Cloudflare
You don’t need advanced technical skills to get started, but a little preparation saves you headaches later. Gather these three things before you begin.
Skipping this prep is the most common reason people run into trouble mid-setup. A few minutes of checking now can prevent an hour of troubleshooting later.
Domain Name and Hosting Requirements
You’ll need a registered domain name and an active web hosting account, whether that’s cPanel, Apache, Nginx, or LiteSpeed-based hosting.
Cloudflare works with virtually any hosting provider since it operates at the DNS level. Just make sure your site is live and reachable before you start.
Access to Your Domain Registrar
You’ll also need login access to wherever you registered your domain, such as GoDaddy, Namecheap, or your hosting provider’s built-in registrar.
This is where you’ll eventually change your nameservers. If you don’t remember your registrar, check your original purchase email or ask whoever set up the domain.
Back Up Your Current DNS Records
Before making any changes, export or screenshot your existing DNS records. This includes your A record, CNAME record, MX record, and TXT record entries.
Cloudflare usually imports these automatically, but having a backup means you can restore anything that gets missed. It’s a five-minute safety net that’s well worth it.
Cloudflare Setup Guide: Step-by-Step Instructions
Now let’s get into the actual Cloudflare Setup Guide process. Follow these steps in order, and don’t skip the verification step at the end.
Each step builds on the last one, so rushing ahead can confuse. Take it slow, especially during the nameserver change.
Create a Cloudflare Account
Head to Cloudflare’s website and sign up with your email address. Confirm your email, then log into the Cloudflare dashboard. The signup process is quick, and you won’t need a credit card for the free plan.
Add Your Website to Cloudflare
Once you’re logged in, click “Add a Site” and type in your domain name. Cloudflare will ask you to choose a plan;
the free plan works fine for most personal and small business sites. Click continue once you’ve made your selection.
Review and Import DNS Records
Cloudflare automatically scans your domain and imports your existing DNS records. Take a moment to compare this list against your backup from earlier.
Look closely for any missing MX records, since email delivery breaks quickly if those get left out. Fix anything that looks off before moving forward.
Update Your Domain Nameservers
Cloudflare will give you two nameservers to add to your domain registrar. Log into your registrar, find the DNS or nameserver settings, and replace the old ones with Cloudflare’s.
This is the step that actually routes your traffic through Cloudflare, so double-check you’ve entered them correctly.
Verify That Cloudflare Is Active
After updating your nameservers, return to the Cloudflare dashboard and wait for the status to change to “Active.”
DNS propagation can take anywhere from a few minutes to 24 hours. You’ll get an email notification once everything’s connected properly.
Configure Essential Cloudflare Settings
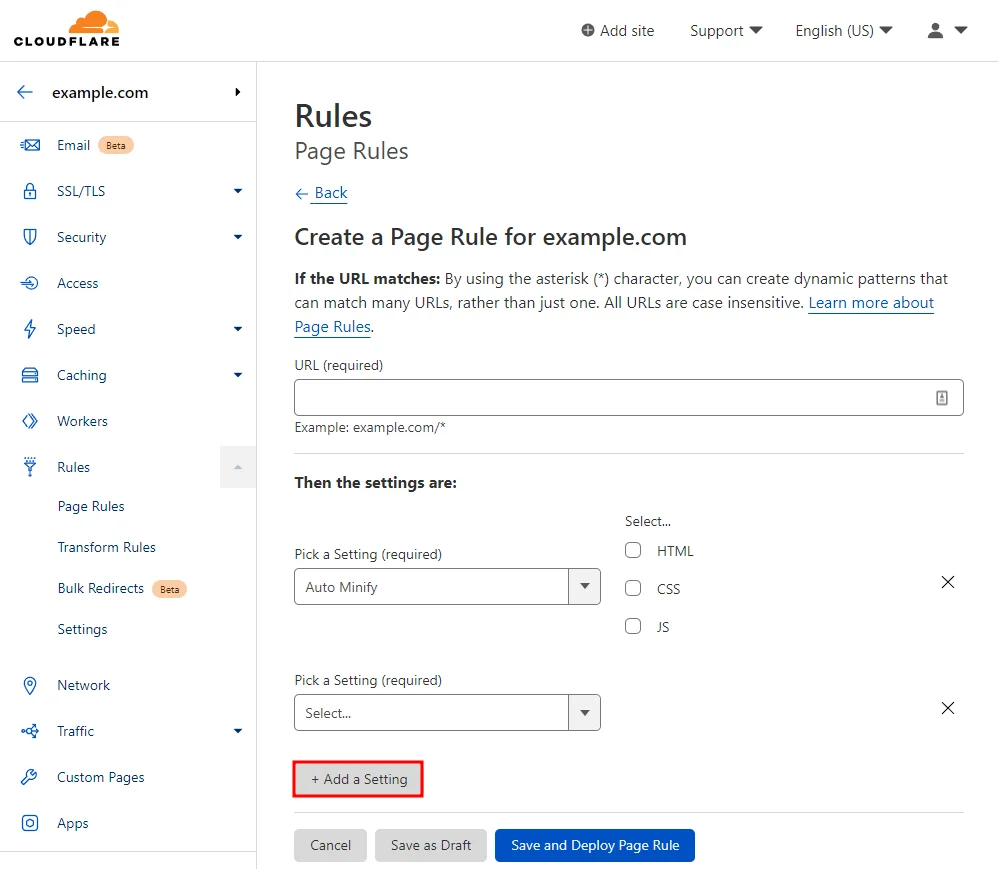
With Cloudflare active, it’s time to configure the settings that actually protect and improve your site. These aren’t optional extras; they’re the core of what makes Cloudflare worth using.
Getting these right the first time prevents the classic “redirect loop” errors that trip up a lot of beginners.
Enable SSL/TLS Correctly
Go to the SSL/TLS tab and choose the right encryption mode. If your host has its own SSL certificate installed, pick Full (Strict). If you’re unsure, Full mode still encrypts traffic without requiring a verified origin certificate.
Avoid Flexible SSL unless your host doesn’t support HTTPS at all, since it can cause redirect loops.
Set Up HTTPS Redirects
Turn on “Always Use HTTPS,” so every visitor automatically lands on the secure version of your site.
This handles your HTTP-to-HTTPS redirect without needing a plugin. It’s a simple toggle, but it closes a real security gap.
Configure DNS Proxy Status
Each DNS record in Cloudflare has a proxy status, shown as either an orange cloud or a gray cloud.
The orange cloud routes traffic through Cloudflare’s protection and caching, while the gray cloud, or “DNS only,” bypasses it entirely. Keep your main site records proxied, but leave records like mail servers on DNS only.
Turn On Automatic HTTPS Rewrites
This setting scans your site for insecure HTTP links and automatically rewrites them to HTTPS.
It’s a small feature, but it prevents mixed-content warnings in the browser. You’ll find it under the SSL/TLS Edge Certificates section.
Optimize Your Website Performance with Cloudflare
Security is only half the story. Cloudflare also gives you several tools to make your site load faster, which matters for both visitors and your Core Web Vitals scores.
None of these settings require technical skill to enable; they’re mostly single toggles in the dashboard.
Enable Caching
Cloudflare caches static assets like images, CSS, and JavaScript at its edge locations.
This means returning visitors, and even new ones nearby, get pages served without hitting your origin server. You can adjust your browser cache and edge cache expiration under the Caching tab.
Enable Brotli Compression
Brotli compression shrinks file sizes more efficiently than older methods like Gzip compression.
Turning it on is usually a single switch, and it works automatically for supported browsers. The result is faster downloads with no visible change for your visitors.
Enable Auto Minify
Auto Minify strips unnecessary characters from your HTML, CSS, and JavaScript files. Smaller files mean faster page load time.
Just test your site afterward, since minification occasionally conflicts with certain scripts.
Configure Cloudflare CDN
Your CDN settings determine how aggressively Cloudflare caches and delivers your content globally.
For most sites, the default settings work well right out of the box. If you run an e-commerce store or frequently update content, consider setting up page rules for finer control.
Improve Website Security with Cloudflare
Cloudflare’s security tools go far beyond basic SSL. With a few adjustments, you can block bots, filter malicious traffic, and reduce spam without touching your server.
These settings work quietly in the background once configured, so you rarely need to revisit them.
Enable Web Application Firewall (WAF)
The Web Application Firewall (WAF) inspects incoming requests and blocks known attack patterns before they reach your site.
It’s available even on the free plan with a managed rule set. Enabling it takes seconds and adds a meaningful layer of protection.
Set Up Security Level and Bot Protection
Under the Security tab, you can adjust your security level from low to high, depending on how aggressively you want to challenge suspicious visitors.
Cloudflare’s bot protection also helps filter out scrapers and automated attacks. Start with the medium setting and adjust based on what you see in your analytics.
Create Firewall Rules
Firewall rules let you block or challenge traffic based on specific conditions, like country, IP address, or user agent.
For example, you could block an entire region that’s been targeting your login page. These custom rules give you far more control than the default settings alone.
Troubleshooting Common Cloudflare Setup Problems
Even with careful setup, you might hit a snag. Most Cloudflare issues fall into one of three categories, and each has a straightforward fix.
Don’t panic if something looks broken right after switching nameservers; propagation delays cause most of the confusion.
DNS Records Not Resolving
If your site won’t load after adding it to Cloudflare, double-check that your nameservers were entered correctly at your registrar.
DNS propagation can also take time, so give it a few hours before assuming something’s wrong. You can use online DNS checker tools to see how propagation is progressing globally.
SSL/TLS Errors
Redirect loops or “too many redirects” errors usually mean your SSL/TLS mode doesn’t match your host’s setup.
Switching from Flexible to Full, or Full to Full (Strict), often resolves the issue immediately. Make sure your origin server actually has a valid certificate before choosing Full (Strict).
Website Downtime After Nameserver Change
Brief downtime right after a nameserver change is normal and usually resolves within a few hours.
If it persists beyond 24 hours, verify that your DNS records were imported correctly and that nothing critical, like your A record, was missed. Reach out to Cloudflare support if the issue continues.
Conclusion
Setting up Cloudflare is one of the most effective things you can do for your website’s speed and security, and it doesn’t require a developer to pull off.
Once you’ve created your account, updated your nameservers, and configured your SSL and caching settings, most of the heavy lifting is done automatically in the background.
Revisit your firewall and performance settings occasionally as your site grows, but the initial setup should hold steady for a long time.
If you run into hiccups along the way, the troubleshooting steps above cover the vast majority of issues people face. Take it one step at a time, and you’ll have a faster, safer site by the end of the day.
Frequently Asked Questions
How Long Does Cloudflare Setup Take?
The dashboard steps take about 15–20 minutes. DNS propagation after the nameserver change can take anywhere from a few minutes up to 24 hours.
Is Cloudflare Free to Use?
Yes, the Cloudflare free plan includes CDN, basic DDoS protection, SSL, and core security features. Paid plans add advanced options like more detailed analytics and additional firewall rules.
Can I Use Cloudflare with WordPress?
Absolutely. Cloudflare works well with WordPress, and there’s even an official plugin that syncs cache purging with your site updates automatically.
How Do I Disable Cloudflare If Needed?
You can pause Cloudflare from the dashboard’s Overview page, which temporarily reverts your site to direct DNS. To remove it fully, revert your nameservers back to your original registrar or host settings.
Do I need technical knowledge to set up Cloudflare?
Not really. Most of the process involves clicking through the dashboard, and Cloudflare guides you at each stage.
Will Cloudflare slow down my site during setup?
No, your site stays live throughout the process. There may be brief downtime only during the nameserver switch.
Can I use Cloudflare on multiple websites?
Yes, you can add as many domains as you like under one Cloudflare account, even on the free plan.
Does Cloudflare work with any hosting provider?
Yes. Since Cloudflare operates at the DNS level, it works with cPanel, Nginx, Apache, LiteSpeed, and virtually any host.
What happens if I don’t update my nameservers?
Cloudflare won’t be able to protect or cache your traffic until the nameservers point to Cloudflare’s servers.
Is it safe to enable Cloudflare’s free SSL?
Yes, Cloudflare’s SSL certificate encrypts traffic between visitors and Cloudflare reliably, and it’s included at no cost.
How do I know if Cloudflare is actually working?
Check your Cloudflare dashboard for an “Active” status, or look for the orange cloud icon next to your proxied DNS records.
Related Posts
- 20 PHP Hosting Providers for Fast Website Performance
- WordPress Speed Optimization: Complete Guide
- How to Speed Up WordPress Site Step by Step
- How to Reduce TTFB: 12 Proven Ways to Improve Server Response Time
- 14 Best WordPress Cache Plugins to Speed Up Your Website
- How to Set Up QUIC Cloud for WordPress (Step-by-Step Guide)
- How to Improve Core Web Vitals: Complete Guide
- WooCommerce Checkout Slow? Advanced Fixes That Work
- LiteSpeed Cache for WordPress (Complete Guide)
- How to Fix Hostinger Slow WordPress Sites?
- How to Fix Bluehost Slow WordPress Websites?

Alex Bryant is the founder of PvyEmpire.com and a WordPress specialist with over 4 years of hands-on experience in web hosting, performance optimization, and website management. He has extensively tested top hosting providers by setting up real websites and monitoring their speed, uptime, and reliability.
At PvyEmpire.com, Alex publishes honest, data-driven reviews, detailed guides, and verified coupons & deals. His goal is to help website owners choose the right hosting, improve performance, and grow their online presence with confidence—based on real testing, not promotions.