How to Build a Website on Bluehost (Step-by-Step Guide)
You’ve picked your hosting plan, maybe even bought a domain, and now you’re staring at a dashboard full of buttons with zero clue what to click first.
That mix of excitement and “okay, now what?” is exactly why so many people search for how to build a website on Bluehost — the tools are all sitting right there, but nobody hands you a map to go with them. If that sounds like where you’re at right now, you’re definitely not the only one.
This guide walks you through the whole process, step by step — from choosing your plan and installing WordPress to customizing your design and getting real content on the page.
I’ll also break down what it actually costs and what to tackle in the days right after your site goes live, so you’re not scrambling to fix things a few months down the road.
What You Need Before Building a Website on Bluehost
Before you touch a single setting, gather a few things. It’ll save you from stopping halfway through setup to go dig something up.
- Your business goals and target audience — who the site is for and what you want visitors to do once they land on it
- A memorable business name to base your custom domain name on
- A short list of must-have pages — think homepage, about page, contact page, and maybe an FAQ
- Branding elements — your logo, brand colors, fonts, and any photos you want to use
- A rough layout sketch — even a napkin drawing of how sections should flow saves time later
None of this needs to be perfect. It just needs to exist so you’re not making these decisions live, in the middle of the setup wizard.
How to Build a Website on Bluehost Step by Step
Bluehost bundles hosting, domain registration, and a guided WordPress setup into one flow, so you’re not juggling three different accounts to get a site live. Here’s exactly how the process breaks down, from buying your plan to publishing your first page.
Step 1: Choose a Domain Name and Bluehost Plan
Start by registering a domain name — ideally a short, relevant one ending in .com if you can get it, since that’s still the extension people trust and remember most easily. Then pick a Bluehost plan that matches your project size.
As of this writing, Bluehost’s shared hosting comes in three tiers, according to Bluehost’s official pricing page:
| Plan | Intro Price | Renews At | Websites | Storage | Monthly Visits |
|---|---|---|---|---|---|
| Starter | $3.99/mo | $9.99/mo | 10 | 10GB NVMe | ~40,000 |
| Business | $6.99/mo | $13.99/mo | 50 | 50GB NVMe | ~200,000 |
| eCommerce Essentials | $14.99/mo | $21.99/mo | 100 | 100GB NVMe | Unlimited (WooCommerce included) |
(Prices reflect a 36-month term; shorter terms cost more per month.)
Selection criteria: The Starter plan wins on price and fits a single blog or small business site. Business is the sweet spot if you’re planning more than one site or want built-in malware scanning and a year of domain privacy.
eCommerce Essentials only makes sense once WooCommerce and 100+ site capacity are actually on your radar.
Decision help: If you’re building your very first website and just need it live, Starter covers it. If you already know you’ll add a second site or a store down the line, Business is worth the extra few dollars a month.
Every tier includes a free domain for the first year, a free SSL certificate, 24/7 chat support, and Bluehost’s 99.99% uptime SLA.
You also get a 30-day money-back guarantee if it’s not working out, though the guarantee doesn’t cover the domain fee if you registered a free one.
Once you’ve paid, Bluehost walks you through initial setup options: start from a professionally designed template, use the guided step-by-step flow with intelligent design suggestions, migrate an existing website, or jump straight to advanced settings in the Hosting Panel if you already know your way around WordPress.
Step 2: Install WordPress on Bluehost
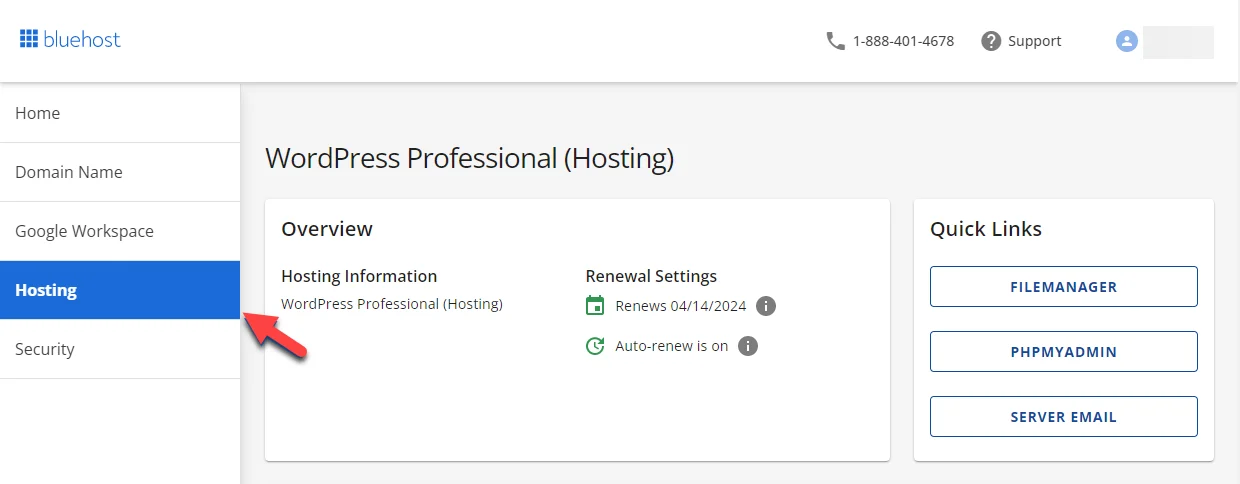
Bluehost installs WordPress automatically the moment you finish checkout — you won’t need to touch cPanel or run a manual installer.
From your Bluehost account, head to the Websites section and click Add Site if you want to spin up an additional install, or go straight into your existing site if this is your first one.
During setup, you’ll pick your site type — Personal, Business & Service, or Online Store — set your website language, and enter a site title and short description of what your business does.
This information feeds directly into how WordPress structures your homepage later, so keep it accurate rather than placeholder text.
Step 3: Choose a Website Builder and Design
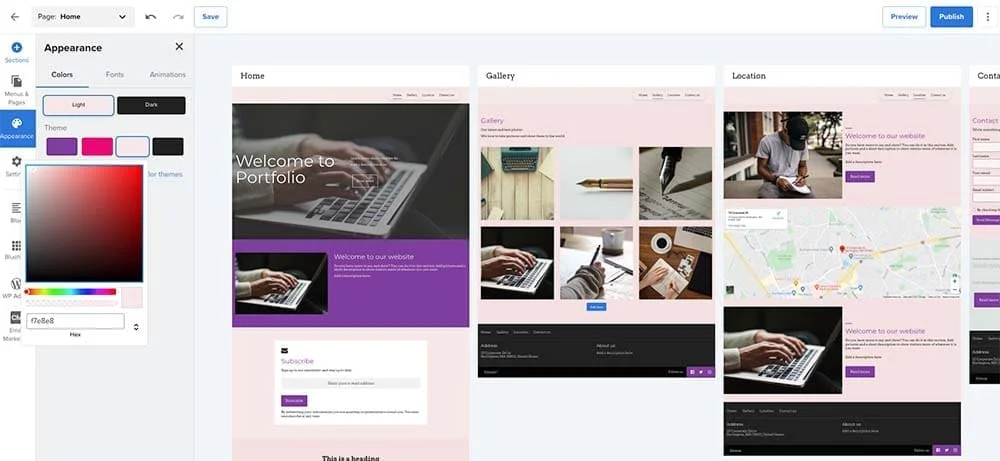
Next, Bluehost asks about your WordPress experience level: Beginner, Intermediate, or Advanced.
This isn’t just a formality — it changes how much hand-holding the onboarding gives you afterward, with more guidance and simplified choices for beginners and more direct access to settings for advanced users.
You’ll then choose from a set of pre-built, customizable templates suited to your site type.
These aren’t rigid — you can swap colors, fonts, and layout blocks freely once you’re in the editor — but starting from a template built for “Online Store” versus “Personal Blog” saves you from rebuilding a page structure that doesn’t fit.
If you have a logo ready, you can upload it here too. Bluehost accepts PNG, JPG, and JPEG files up to 5MB.
Step 4: Customize Your Website
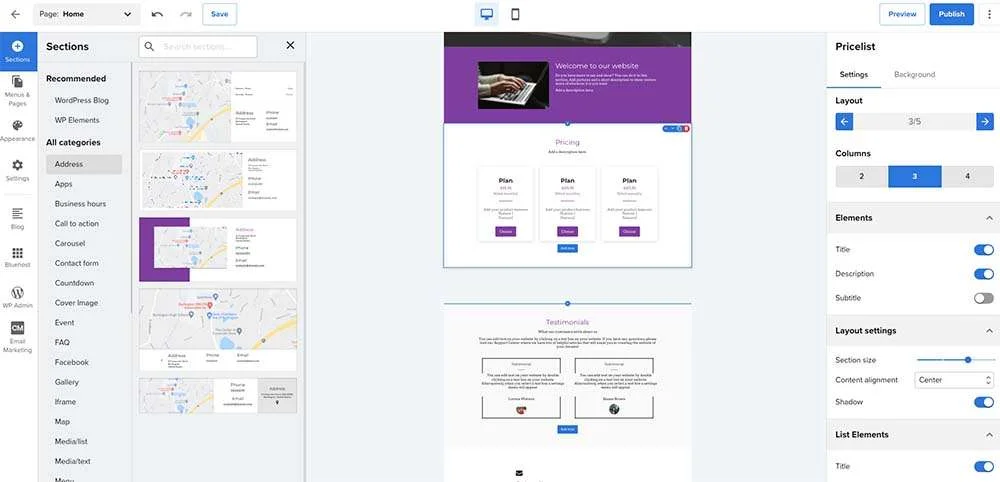
This is where the site actually starts looking like yours. Bluehost’s layout editor loads your chosen template with placeholder content — sample headlines, section text, and stock images — that you replace piece by piece.
Work through it in this order to avoid backtracking:
- Swap the headline and business tagline for your real messaging
- Replace placeholder service or product descriptions
- Update the navigation menu so it reflects your actual pages
- Add your contact information and any call-to-action buttons (book now, shop, contact us)
- Swap stock photos for your own, or pick from Bluehost’s built-in library of royalty-free images
- Apply your brand colors and font pairing consistently across every section
Bluehost’s WordPress Website Builder uses block-based editing, so each section — headers, image galleries, FAQ blocks, forms — is its own movable, editable piece. When a section looks right, hit Save & Publish before moving to the next one; you don’t need to finish the whole site in one sitting.
Step 5: Add Essential Pages and Website Content
A template gives you a shell. These pages are what actually make the site useful to a visitor:
- Homepage — your value proposition, stated clearly in the first few seconds of scroll
- About page — who you are and why someone should trust you
- Services or Products page — what you sell, with enough detail to answer basic questions
- Contact page — a form, email, phone number, or all three
- FAQ page — cuts down on repetitive support emails
Depending on your business, you might also add a booking tool, an online contact form, or a live chatbot to catch visitors before they leave.
If you’re selling products directly, this is also where you’d bring in eCommerce add-ons for online selling rather than trying to bolt them on later.
Step 6: Add Essential WordPress Plugins
Bluehost pre-installs a small set of plugins on every WordPress site so you’re not starting from zero, according to Bluehost’s own plugin guide:
| Plugin | What It Does | Included? |
|---|---|---|
| Yoast SEO | On-page SEO, readability checks, XML sitemaps | Pre-installed, free tier active |
| Jetpack | Site stats, backups, built-in CDN | Pre-installed, free tier active |
| CreativeMail | Syncs blog content into email campaigns | Pre-installed, free tier active |
| OptinMonster | Popups and lead-generation forms | Available, paid |
| WooCommerce | Full online store functionality | Available, free to add |
Decision help: Most new sites only need to configure Yoast SEO (for search visibility) and Jetpack (for backups and basic stats) in the first week. Hold off on paid add-ons like OptinMonster until you actually have traffic worth converting.
Step 7: Optimize Your Website for SEO and Mobile
Every Bluehost WordPress plan comes with Yoast SEO active, which handles a lot of the technical groundwork automatically — XML sitemaps, readable URL structures, and meta description fields on every page and post.
Fill in a title tag and meta description for each page using Yoast’s on-page panel; this is what shows up in Google search results, so make it specific rather than generic.
Mobile responsiveness is largely handled by your theme — Bluehost’s built-in templates are responsive by default, meaning they resize automatically for phones and tablets.
Still, preview every page on a phone-sized screen before launch, since text that looks fine on desktop sometimes overlaps or gets cut off on mobile.
Step 8: Review and Launch Your Website
Before you publish, run through this checklist:
- Click through every page and menu link to confirm nothing 404s
- Check that contact forms actually send to your inbox
- Confirm your free SSL certificate is active (look for the padlock icon next to your URL)
- Preview the site on both desktop and mobile
- Double-check your site title, meta descriptions, and business info are accurate
- Hit publish from the WordPress Admin dashboard
Once it’s live, your domain should resolve within a few minutes to a few hours, depending on DNS propagation.
How Much Does It Cost to Build a Website on Bluehost?
Building a website on Bluehost yourself typically costs somewhere between $50 and $250 for the first year, once you factor in hosting, your domain, and any optional extras.
Hiring someone else to build it costs significantly more, but you’re paying for time and design expertise you don’t have to provide yourself.
| Build Method | Typical Cost | What’s Included |
|---|---|---|
| DIY on Bluehost | $50–$250 (year one) | Hosting from $3.99/mo, free domain (1st year), free SSL, free theme |
| Freelance WordPress developer | $2,000–$7,600 | 40–80 hours of build time at $50–$95/hour |
| Small web design agency | $3,000–$15,000 | Strategy, custom design, and development |
| Full-service agency | $12,000–$35,000+ | Complete custom build, ongoing retainer support |
Sources: Bluehost pricing, WebFX website cost data, WebsiteSetup small business cost breakdown.
Your ongoing costs after year one mainly come down to hosting renewal (Starter renews at $9.99/month) and domain renewal, which runs roughly $12–$25 a year depending on the extension.
If you add premium plugins, a paid theme, or Google Workspace email, budget an extra $60–$150 a year on top of that — but none of it is required to have a fully functional site.
What to Do After Launching Your Bluehost Website
Launching isn’t the finish line — it’s closer to opening day. A few things are worth setting up in your first week live.
Set Up Analytics and Performance Monitoring
Connect Google Analytics as soon as your site goes live so you’re collecting traffic data from day one instead of guessing later what visitors did in your first month.
Track basic metrics — page views, clicks, and where visitors drop off — so you know which pages are actually working.
Jetpack’s built-in stats module (already installed on your site) gives you a lighter-weight alternative if you want something simpler than full Google Analytics.
Keep WordPress, Themes, and Plugins Updated
WordPress, your theme, and every plugin need regular updates — not just for new features, but for security patches.
Bluehost’s “Seamless Updates” feature, included on every plan, handles a lot of this automatically, but it’s still worth logging into your WordPress Admin dashboard every couple of weeks to confirm nothing’s flagged as needing manual attention.
Weekly backups are included on every Bluehost plan too, so if an update ever breaks something, you’re not starting from scratch.
If you’re collecting any visitor data — email signups, contact form submissions, analytics cookies — set up a privacy policy page before you start actively promoting the site.
WordPress includes a basic privacy policy template under Settings, which you can adapt to your specific data practices.
Frequently Asked Questions About Building a Website on Bluehost
Is Bluehost Good for Building a Website?
Bluehost is a solid choice for beginners, largely because of its one-click WordPress installation and officially recommended status from WordPress.org. It’s less suited to developers who want granular server control, since shared hosting has resource limits that VPS or dedicated hosting don’t.
Can I Build a Website on Bluehost Without Coding?
Yes. Bluehost’s WordPress Website Builder uses a drag-and-drop, block-based editor, and its AI-assisted setup suggests layouts and content based on your business type. You can build a complete, functional site without writing a line of code.
Is WordPress Free With Bluehost?
WordPress itself is free and comes pre-installed with every Bluehost hosting plan. You only pay extra if you choose premium themes or premium plugin features beyond what’s included.
How Many Websites Can I Build on Bluehost?
It depends on your plan: the Starter plan supports up to 10 websites, Business supports up to 50, and eCommerce Essentials supports up to 100, according to Bluehost’s current plan comparison.
Final Takeaway
Building a website on Bluehost comes down to eight manageable steps — pick a plan, install WordPress, choose a design, fill in real content, and launch.
None of it requires coding knowledge, and the built-in tools (Yoast SEO, Jetpack, free SSL, weekly backups) mean you’re not hunting down separate services just to cover the basics.
If you want the cheapest possible path to a live, functional site, the Starter plan and a template-based build will get you there in an afternoon.
If you’re planning to scale into multiple sites or an online store, it’s worth starting on Business or eCommerce Essentials so you’re not migrating plans halfway through.

Alex Bryant is the founder of PvyEmpire.com and a WordPress specialist with over 4 years of hands-on experience in web hosting, performance optimization, and website management. He has extensively tested top hosting providers by setting up real websites and monitoring their speed, uptime, and reliability.
At PvyEmpire.com, Alex publishes honest, data-driven reviews, detailed guides, and verified coupons & deals. His goal is to help website owners choose the right hosting, improve performance, and grow their online presence with confidence—based on real testing, not promotions.