Bluehost Nameservers: What They Are & How to Change Them
Setting up a new website is exciting — right up until you hit that domain settings page and see a bunch of unfamiliar fields staring back at you.
Maybe you just signed up for hosting and now you’re stuck trying to figure out where your domain even points to. That’s usually the moment people run into Bluehost nameservers for the first time, and honestly, it trips up a lot of beginners.
In this guide, we’ll break down exactly what Bluehost nameservers are, where to find them, and how to update them whether your domain was registered elsewhere or directly through Bluehost.
You’ll also get a step-by-step walkthrough for making the switch, plus a few common mistakes that can delay your site from going live. By the end, you’ll know exactly what to do — no guesswork involved.

What Are Bluehost Nameservers and How Do They Work?
Bluehost nameservers are the two DNS addresses — ns1.bluehost.com and ns2.bluehost.com — that tell the internet which servers are authoritative for your domain’s DNS records. Once your domain points to these nameservers, Bluehost controls where your site, email, and subdomains resolve.
Think of a nameserver as the front desk of a hotel. When a guest (your visitor’s browser) asks for a room number (your website), the front desk checks its records and sends them to the right place.
Without that lookup, the guest just wanders the lobby forever. In technical terms, nameservers translate your domain name into the IP address of the server hosting your files.
Every change you make in Bluehost’s DNS zone — A records, MX records, CNAMEs — only takes effect if your domain is actually pointed to Bluehost’s nameservers in the first place. Get that step wrong, and none of your other DNS settings matter, since the registrar is still asking a different set of servers for answers.
Where to Find Your Bluehost Nameservers
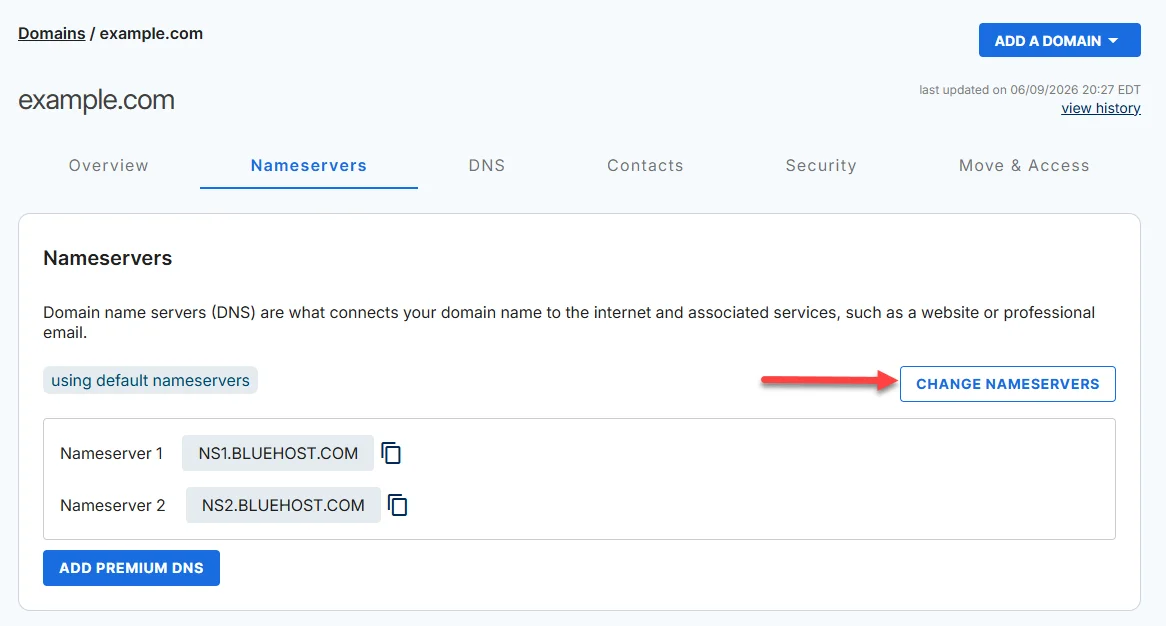
You’ll find your current nameservers under the Domains tab in your Bluehost account dashboard. Here’s the quickest path:
- Log in to your Bluehost portal.
- Click Domains in the left-hand menu.
- Select the domain you want to check (if you manage more than one).
- Open the Nameservers tab.
This screen shows whichever nameservers are currently active for that domain — either Bluehost’s defaults or a custom set you’ve entered.
If you registered your domain directly through Bluehost, it’s already pointed to ns1.bluehost.com and ns2.bluehost.com by default, so you shouldn’t need to touch anything unless you’re moving hosts or adding a third-party DNS service like Cloudflare.
When Do You Need to Change Bluehost Nameservers?
You need to change your nameservers any time you want a different provider to control your domain’s DNS — most commonly when you’re switching hosts, connecting an externally registered domain to Bluehost, or routing your domain through a third-party DNS service.
A few real-world scenarios where this comes up:
- You bought your domain elsewhere but host with Bluehost. Registrars like GoDaddy or Namecheap don’t automatically know your site lives on Bluehost — you have to point the nameservers manually.
- You’re leaving Bluehost for another host. Your new provider will hand you their nameservers, and you’ll swap them in wherever your domain is registered.
- You want to use Cloudflare (or a similar DNS layer) for performance or security. In this case, you’d point your domain to Cloudflare’s nameservers instead, then manage your A and CNAME records from there.
- You’re consolidating multiple domains under one DNS provider to simplify management.
One thing worth flagging from experience: people often change nameservers and then panic when email stops working. That’s usually because MX records reset when you switch DNS providers — so if email matters to you, have those records ready to re-add immediately after the switch.
How to Change Nameservers for a Domain Registered with Bluehost
If your domain is registered through Bluehost, you can update its nameservers directly from your account in a few clicks. The process below applies whether you’re switching to a different host or adding custom nameservers.
Open Your Domain’s DNS Settings
Log in to your Bluehost portal, click Domains, and select the domain you want to update. Click into the Nameservers tab, then hit Change Nameservers to unlock the editable fields.
Enter Your New Nameservers
Type in the new nameserver addresses your target host or DNS provider gave you — typically two, though some providers issue three or four. Double-check for typos here; a single misplaced character will send your domain to nowhere instead of your new server.
Save the Changes and Verify the Update
Click Save, and Bluehost will queue the update. It won’t take effect instantly — expect a delay while the change spreads across the internet’s DNS network, which we’ll cover in the next section.
You can verify the update went through by revisiting the Nameservers tab and confirming the new values are listed.
How to Point a Domain Registered Elsewhere to Bluehost
If you bought your domain through a different registrar but want Bluehost to handle your DNS, you’ll make the change at that registrar’s dashboard, not inside Bluehost.
- Log in to the account where your domain is registered (GoDaddy, Namecheap, Google Domains, etc.).
- Find the domain management or DNS settings section — it’s often labeled Nameservers or Name Server Management.
- Choose the option for custom or third-party nameservers.
- Replace the existing entries with
ns1.bluehost.comandns2.bluehost.com. - Save the changes.
From that point on, Bluehost becomes the authoritative DNS host for your domain, and you’ll manage A records, MX records, and subdomains from your Bluehost dashboard instead of your registrar’s.
How Long Does Bluehost Nameserver Propagation Take?
Nameserver propagation for Bluehost typically takes anywhere from a few hours up to 48 hours to fully complete worldwide.
The exact timing depends on the TTL (time to live) value your previous DNS provider had set and how aggressively your ISP caches DNS lookups.
| Scenario | Typical Time |
|---|---|
| Best case (low TTL, fast ISP refresh) | 1–4 hours |
| Standard case | 12–24 hours |
| Worst case (high TTL, slow global caching) | Up to 48 hours |
During this window, some visitors may still land on your old server while others reach the new one — that’s normal and not a sign anything broke.
If you want to check progress without relying on your browser’s cache, a tool like DNS Checker or running a dig command against a public resolver (like Google’s 8.8.8.8) will show you the live, global picture rather than what your own device has cached.
What to Do After Changing Your Nameservers
Once you’ve updated your nameservers, the job isn’t quite finished — you still need to confirm everything resolves correctly and catch any issues before they affect visitors or email.
Verify Your Website and DNS Records
Load your domain in a browser (ideally from a different network or device to avoid cached results) and confirm your site displays properly.
Then check that your A records, CNAME records, and any subdomains are correctly configured in your new DNS host’s control panel — nameserver changes don’t automatically carry over individual DNS records unless you’ve set them up on the new side.
Troubleshoot Website or Email Issues
If something’s not working after 24–48 hours, work through these common culprits:
- Site still shows the old host: Clear your browser cache or test from an incognito window — propagation delays are the most frequent cause.
- Email stopped working: Re-check your MX records; they don’t transfer automatically when nameservers change.
- SSL certificate errors: Reissue or reinstall your SSL certificate once the domain is fully pointed to the new server, since some certificates are tied to the original hosting environment.
- “Domain not found” errors: Double-check for typos in the nameserver values — even a missing period or extra space can break resolution.
Conclusion
Bluehost nameservers are the foundation that connects your domain to your hosting environment, and getting them right is the first real step in launching or migrating a website.
Whether you’re pointing a domain registered elsewhere to Bluehost, or moving away from Bluehost entirely, the process comes down to the same basics: grab the correct nameserver values, update them at the right registrar, and give propagation the time it needs — up to 48 hours in some cases.
Once that’s done, double-check your DNS records and email settings so nothing quietly breaks in the background. Handle those steps in order, and the switch should be smooth enough that most visitors never notice it happened at all.
Frequently Asked Questions
What are Bluehost’s default nameservers?
Bluehost’s default nameservers are ns1.bluehost.com and ns2.bluehost.com. These are automatically assigned to any domain registered directly through Bluehost.
Can I use custom nameservers with Bluehost?
Yes, but custom (private) nameservers are only available on Bluehost’s VPS and Dedicated hosting plans, not shared hosting. They let you brand your DNS servers using your own domain, like ns1.yourdomain.com.
Will changing nameservers affect my email?
Yes. Since nameservers control all DNS records, including MX records, switching them can temporarily break email delivery until you re-add those records with your new DNS provider.
How do I know if my nameserver change worked?
Check the Nameservers tab in your Bluehost dashboard to confirm the new values saved, then use a DNS lookup tool to verify the change has propagated across the internet.
Do I need to change nameservers if I bought my domain through Bluehost?
No. If your domain was registered directly with Bluehost, it’s already pointed to Bluehost’s nameservers by default — no action is needed unless you’re moving to a different host or DNS provider.

Alex Bryant is the founder of PvyEmpire.com and a WordPress specialist with over 4 years of hands-on experience in web hosting, performance optimization, and website management. He has extensively tested top hosting providers by setting up real websites and monitoring their speed, uptime, and reliability.
At PvyEmpire.com, Alex publishes honest, data-driven reviews, detailed guides, and verified coupons & deals. His goal is to help website owners choose the right hosting, improve performance, and grow their online presence with confidence—based on real testing, not promotions.